Tea Cup Candle

I have been eyeing up this DIY for awhile now and finally put aside a little time to do it… I am seriously IN LOVE with how it turned out! My in-laws are moving back home from being out of state for several years and I thought this would be a great little house warming gift because my mother-in-law is super into shabby chic. Actually, I like these so much I’m considering making a bunch more and giving them out for Christmas gifts this year.

img_9732

I think you’ll really love this DIY, too. It’s inexpensive, not at all time-consuming, and would be easy to customize. I got the majority of the items at the dollar store, with the exception of the tea cup. I got that from a resale shop. Altogether this DIY cost me under $5 and took around 30 minutes from start to finish, plus dry time.

Materials:
-Tea Cup
-Candle
-Oven Mitts
-Funnel
-Glass Bowl
-Boiling Pot

Directions:
-Fill pot half full with water and bring to a soft boil.
-Remove wick from candle. Place wick upright in the center of the tea cup.
-Cut candle into smaller pieces and place pieces in the glass bowl.
-Boil wax until it turns to clear liquid.
-Use oven mitts to safely remove glass bowl and funnel to pour wax into tea cup.
-Let stand for several hours to cool and settle.

Adult Tutu

img_7578

Disclaimer: This post has been sitting my drafts section for quite some time. Before you read on, I’d like to mention that this DIY is not for Halloween only. It can be customized for birthday parties, brides-to-be, or to cheer on your favorite football team.

For years I have been wanting to sport a super cute adult tutu and decided that this past Halloween was finally my time to shine. I’m by no means a sewing expert, so these no-sew directions were totally my style. Interested in making your own? All you’ll need is a whole bunch of tulle, ribbon, and a pair of scissors… Let’s get started!!!

There are two ways you can go with tulle, bolt or spool. I opted for tulle off of the bolt, but looking back I wish I would have gotten the spools of tulle to speed up the cutting process. If you do decide to purchase spools, I would get at least three rolls. I personally bought about eight yards for the size and length I was looking for, but in doing some research I found that generally you should get six to ten yards. Start by folding your tulle in half the long way and cutting six inch wide strips. Shorten these strips to your liking depending on the length you’ll want your tutu. Cut your ribbon to be about double the length of your waist. Then the fun part begins… tie each piece of tulle around the ribbon by looping it around with your fingers. This was definitely the most time consuming part, so have Netflix up for sure. From there, adjust the tulle as needed to fit all the way around your waist. And TA-DA you have yourself a super fun adult tutu!!!

What I love most about this DIY is that you can customize the tutu to your own liking. You could alternate different colors of tulle, use strips of ribbon or sparkly tulle, and even use a stretchy waist band to really make it your own. The possibilities are seriously endless, XOXO.

Paint Stick Flag

Happy Memorial Day! Thank you to our country’s true heroes who have given the ultimate sacrifice for our freedom.

image.jpeg

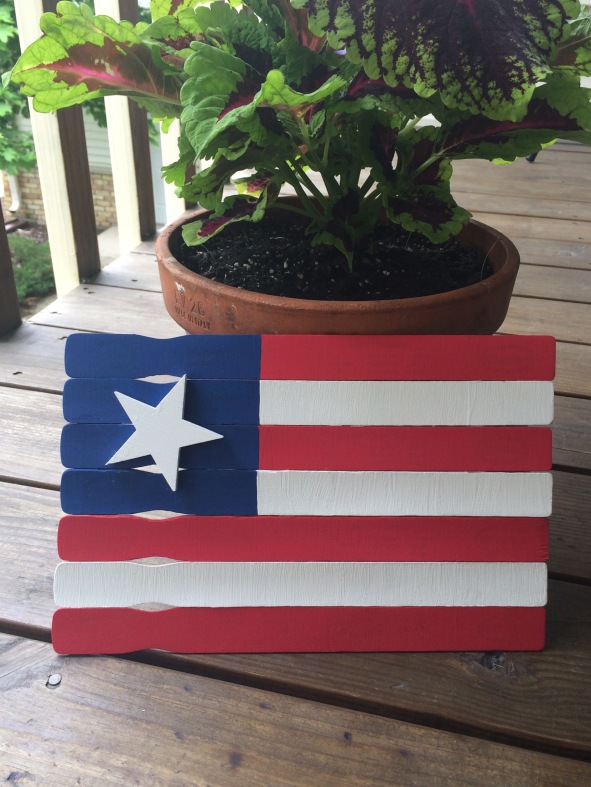
In honor of this day I want to share a super cheap and simple patriotic craft.

Materials: 10 paint sticks (which are generally free from your local hardware store), red/white/blue paint, sponge brushes, hot glue, and a wooden star.

Directions: Paint 7 sticks and the star using the picture above as a guide. I needed 2-3 coats for a true opaque effect.Using small drops of hot glue, attach the star to the front and 3 vertical paint sticks to the back, one on each end and on in the middle. Ta da! You have yourself a fun patriotic accent for inside the house or out, XOXO.

Essential Oil Room Spray

Who else LOVES essential oils? They smell great, are so versatile, and the health benefits are endless! I got this set as a Christmas gift last year and find that it is the perfect starter kit if you are interested in getting more into essential oils.

One of my most recent favorite ways to use essential oils is to make a room spray.

image

Interested? First you’ll need to get spray bottles. I purchased these and loved them. The blue glass protects the formula from going bad and they are really great quality for the low price. Add 1 1/2 cups distilled water and 3 ounces rubbing alcohol to the bottle. The alcohol will help the oil and water stay mixed together. Use a dropper to mix in about 30 drops of oil, and BAM, there is your room spray. So easy, right?!

My favorite combos are… Citrus Mint (10 peppermint, 20 orange), Lavender (30 lavender), and Mojito (15 peppermint, 15 lime). I use the minty ones in the bathroom because they cover up yucky smells and the lavender one I like to spray on my pillow before bedtime.

Try this out and let me know what you think, XOXO!

Marble Mugs

I saw this and instantly knew that I had to try it out…

This is a cheap and quick diy. All you need is… a plastic container, warm water, nail polish, and a white mug. I got my mugs from Dollar Tree and used nail polish I already had at home because (let’s be honest) I have a ton. You will want to use a big enough plastic container to almost completely submerge your mug into.

Start by filling the container with warm water. Pour a few drops of nail polish into the center of the water and work fast to dip your mug. And TA DA you have yourself a super cute marble mug! It’s really that simple, XOXO.

Welcome!

Thanks everyone, for coming to check out my new lifestyle blog. I love all things beauty, books, fashion, family, travel, food, wine, crafts, and diy. There will definitely be a little something for everyone here. Look around and have some fun! XOXO